Friday, May 31, 2013

More from Studio Calico Spencer's kit

I am so happy that the weather has been so great here. It has been sunny and warm. We have been having a good time at the beaches lately. I decided to use one of the photos from our trip to the beach last weekend.
Now that I am subscribing to the Studio Calico kits, I need to finish using the ones I have before I get a new one every month. I am loving all the inspiration by fellow members and designers at Studio Calico.
I was recently very inspired by Wilna's video on Studio Calico blog. I didn't copy the entire layout but I did scraplift the banner under the photo. I even used the same cut files that she used. I loved the effect of the brightly colored banner against the black and white photo and the chalkboard background that this layout ended being. The text on the Glitz chalkboard paper has got to be one of my favorite elements of the Spencer's kit.

 
And of course ..... a very special mention to the Tim Holtz tiny attacher. I got it last week and I used it to make the banner. 
Just having fun .... 
~Neela


Monday, May 27, 2013

Elle's Studio Thursday Sketch

I recently bought the Serendipity paper pack and pennants from Elle's studio and also their May kit, so I decided to play along their thursday sketch contest. It is a very cute and trendy sketch.

I loved using all this new collection to make my layout. The colors and patterns are so beautiful. Here is my layout:


This photo was taken in the summer of last year when we were at the beach. Surya's favorite pastime was to try and run away from the water before the waves touched him.... at least in the beginning. Before you know, he was rolling around in the water and was soaking wet. I love this photo because it is so natural and full of love.
The cardstock and pennants are from Elle's Studio, the cork camera and acrylic heart are from Studio Calico Spencer's kit and Planetarium kits and the enamel dots are from My Mind's eye.
Here is the sketch from Elle's studio:


Wednesday, May 22, 2013

Tone on Tone

There was this beautiful yellow paper with distressed white hearts from the dear lizzy lucky charm collection in my May kit from Studio Calico that totally caught my eye. I totally wanted to make a layout that showed of this paper in a special way. Well, here is my effort on trying to show it off. I decided to make a tone on tone layout. This is the first time that I have made one. I found these cute photos of Surya playing in the yard that seemed to match the paper. Yes, I totally selected the photos after selecting my paper.Then I went around collecting all my yellow supplies....ink pads, sun sticker from paradise beach collection, label stickers and title from October Afternoon, Amy Tangerine's stitching stencil and thread from Yes Please collection, Taxi mist from Studio Calico, enamel dots from My Mind's Eye, washi and some yellow Recollections cardstock that I had. It was so much fun putting this layout together. For once, I did not follow any sketches. I just placed the photos where I wanted them to be and kept adding the misting, stitching, paper and washi layers, stamping, embossing  and  embellishements. Since I really did not plan on where my journaling would go, I ended doing strip journaling.

So here is my yellow layout:


I also punched out little hearts from the lucky charms paper and stuck them on with little cut up pop dots all over the page to emphasize the hearts.
Hope you enjoyed looking at it as much as I enjoyed making it.
~Neela
 

Saturday, May 18, 2013

Mid week Mojo with Scrapbook Steals - Peridot 3

I really plan on keeping up with the mid week mojos at scrapbook steals this series. I missed Peridot 1 but will catch up one of these days :)

Recently I started subscribing to the kits from Studio Calico. I am on the second kit and the papers and other embellishments are so trendy and amazing. I am loving them. Look at what the May kit looks like. Gorgeous isn't it? Make sure to check out their website... they have tons and tons of insiration.

 
I used this kit to create my layout for Peridot 3. This time we have talented Marisa Torp as the guest sketcher. I loved the sketch. It was simple and yet one can do so much with it.
This was my first experience with wood veneer. The kit contained studio calico wood veneer letters. They are super fun to use. I found that using the Xyron sticker maker to adhere them was least messy way.
Here is my layout:


These photos were taken when we were vacationing at Cancun. It was such and fun the resort we stayed at was called Dreams and hence the title. All activities were available at the resort itself. We didn't have to step out for anything if we didn't want to. But since this was our first time we went to Chichen Itza and Xcaret. Doing all these activities being 7 months pregnant with Surya was a challenge but was still a delightful experience. I would go back to this resort in a heartbeat. I am so glad that we got some professional photographs taken here.
 

Here is the sketch from Marisa Torp:


Sunday, May 12, 2013

Big and Tiny

I created this layout of my brother and son with photos taken during a walk around our complex. These were taken some time last year. I have been wanting to scrap these photos for some time.... I totally love their size differential and wanted to highlight that. I know that some day Surya will catch up to his uncle.
I created this layout to play along the Mid Week Mojos at scrapbook steals. I based the layout on the sketch for Peridot 2:

Here is my layout:


Almost all the papers and stickers used on this layout are from the Spencer's kit from Studio Calico. I am not sure of the origin of the black thickers used for the title. I also used Heidi Swapp's gold color shine. I did some stamping which kinda got lost once I did all the layering behind the photos. I used staples again generously on this project. I still don't have the tiny attacher so I just used the normal stapler. The star stickers in this kit were so cute. I decided to pair a bigger star with a tiny star to go with the theme of the layout.
 

Thursday, May 9, 2013

DT Doodles 2013 - Week 18 with Kiwi Lane Designs

This may be the first time that I am playing along with the DT doodles at Kiwi Lane Designs.....hopefully it is not the last.
As soon as I saw Kristy Lee's sketch and layout for this week, I was totally inspired to play along and having most of the templates helped too. Kristy is such a talented and amazing person. It is hard not be inspired by her writing and work.
Here is the sketch by Kristy:
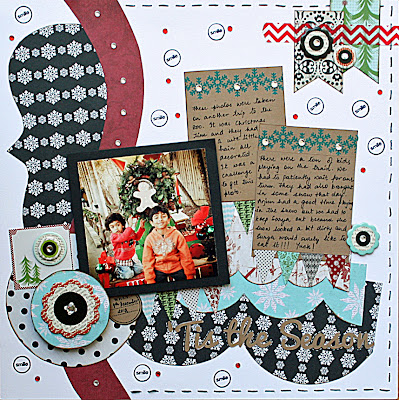
Here is my layout:


This is such a non seasonal layout. We are heading into summer and I ended up creating such a Christmasy layout. But I really wanted to get this photo of my kids sitting on a decorated train at the zoo scrapped and felt that this sketch totally suited it. I used the Christmas Town collection
 from lily bee for the most part. Since it started looking a little busy, I decided to use kraft cardstock for my journaling and title to tone it down a little bit. Like Kristy I also stamped the smile circle with Kelly Pannaci clear stamps. I so totally enjoyed creating this layout especially when I was blinging it all up with the Rhinestones from Scrappn' supplies. I used the following Kiwi Lane Templates:
  • Scallops 3a, 2a, 1a
  • Rings 2
  • Cascade Trails 1a
  • Sweetheart 4

  • Scrapbooking is fun, fun and more fun.... :)
    ~Neela

    Scrapbook Steals May Blog Hop Winner

    ..... And the winner is Marissa T. Marissa let me know your e-mail id and I will contact you to send you the paper pads, ink dropper and the Amy Tan stitching template.
    Thank you so much for stopping by. Hope you all have a great day.
    ~Neela

    Friday, May 3, 2013

    Blog Hop with ScrapbookSteals - Two Berry Creative Twine

    I am so happy to be part of this blog hop. Thank you Scrapbook Steals for letting me be part of it. I love the daily deals on Scrapbook Steals. They have two deals a day and my day is not complete without checking them out and a lot of times falling prey to buying them :)
    It's always fun to work with twine. I don't use too much of it just out of laziness. But it adds so much texture and interest to the projects, I am going to make it a point to start using more of it. I got a green and blue combo twine. When Melodee asked me which colors I prefer, I told her anything other than pink and purple because I have two boys. But then I am like wait a minute, I forget that I need to start scrapbooking more of myself . So I decided to use the green and blue twine for a photo of myself too.

    For my first layout, I went for a fun and playful look with photos of my son playing in the park. I used the twine to help me with this look big time. I used it in three ways... to separate the two photos, to help pull out the hidden journaling tag easily and to create the hanging words. I would have loved to use the tiny attacher (everyone seems to be talking about this) but I didn't have one so I used a regular stapler to hold the twine segments together.

    A closer look at the journaling tag .....
     

    For my second layout, I went for a more demure look. This is a photo of me at the Santa Barbara Harbor. I used some pop dots to create some dimension. I used the twine to make the spirals in the circles and embellished them with enamel dots. I cut out off centered circles from my outer circles using silhouette. I have explained how to make the spirals below.


    Here are the steps to create the sprial with the twine:
     1. I first cut out a circle from cardstock.

    2. I then added ample glue with my ATG and placed a glue dot in the center. The glue dot helped me get a good start for the spiral.
    
     3. I started creating the spiral by holding down the center and twisting the cardstock and pressing the twine down firmly as I went.

     4. And here is your finished product.
     

    All other materials for both my layouts are mainly from the Spencer's Scrapbook Kit from Studio Calico. I used Mister Huey's Mist from Studio Calico and Enamel dots from My Mind's Eye. If you are interested, I cut out the words on the playground layout with Pacifico font with silhouette and I used Travelling typewriter font for the journaling on the other layout. Both the fonts are free. I still have so much of the twine left. These are really big spools and will last you a long time.

    I am doing a giveaway of my own. Make sure that you are a follower and leave me a comment. I will pick one luck winner to get an ink dropper from Studio Calico, a couple of 6x6 paper pads - So Sophie from My Mind's eye and FarmHouse from Crate Paper and Amy Tangerine's embroidery stencil (Note: This is not whole kit - just one of the stencils as shown in the photo). You have until May 8th to leave your comments. I will announce the winner on Thursday May 9th.


    Hope the ideas have inspired you to grab your twine from scrapbook steals and start creating your own projects.

    Make sure that you complete the blog hop and leave comments along the way. One lucky winner will get a $20 worth gift code to spend at scrapbook steals.

    To continue in the National Scrapbook Day Celebration, play along with the challenges from ScrapbookSteals.com. Here is the first challenge presented by scrapbook steals:
     
    Challenge #1
    Since we are celebrating with BabySteals.com's 5th Birthday this week, create a project with 5 different pattern papers, 5 embellishments (buttons, brads, ribbon, twine, flowers etc) and 5 word-based items (title, journaling, stickers etc)
    Check out all of the challenges here: National Scrapbook Day Celebration


    Now hop on to the next blog:
    1. ScrapbookSteals
    2. Memorable Scraps - Neela Nalam < ---- You are here
    3. Want Less Create More - Judy Stech ---- > Go here next
    4. Allison Day Designs - Alison Day
    5. Scrappin' Chaos-Charity Hotrum
    6. Stephanie's Scrap World - Stephanie Umpleby